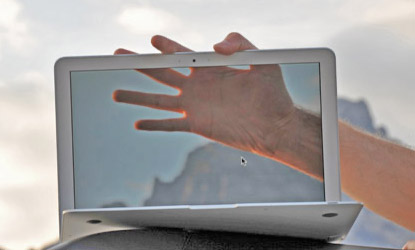
Behind the Shot: Special Effects in the Tetons 🔗
Remember the following shot from my trip to the Grand Tetons this past fall?
I took this photo as part of the week-long Photography at the Summit workshop, which was taught by a team of world-class, famous photographers. Early in the week, the instructors made it clear that the Grand Tetons were one of the most-photographed mountains (from Ansel Adams on forward), and that unless we could somehow take a picture of the Tetons that was different than the millions of photographs taken by others before, they weren't interested in seeing them.
I took this as a challenge. And the photograph above was the result.
During the daily critique, when my photo came up, the audience gasped (which is the best response you can hope for, I assure you!), and several people exclaimed "how did you do that??"
We weren't allowed to use Photoshop in the class, by the way. No bits were manipulated to make the above shot.
On the last evening of the workshop, we all gathered for a wrap-up dinner, and a slide show ran in the background, showing some of the best shots of the week. Two things happened that made me beam with pride: Ed Riddell, a famous large format landscape photographer, ran up to the projector and skipped forward to this photo to show his wife. Jay Maisel, another famous photographer from New York City (and by far the harshest critic during the daily critiques), came up to me and said he thought it was one of the best shots of the week. Given how many excellent photos were snapped during the week, I was very flattered.
The result may be cool, but this shot was a pain to take. Here is how I did it:
I started by taking a reference shot of the Tetons to get the optimal exposure:

I intentionally overexposed the shot because it would soon be going on my laptop screen, where it risked being washed out.
Next, I placed my camera on a tripod and then placed my laptop (a MacBook Air) on the roof rack of my rented Ford Explorer. I then adjusted the camera and tripod to get exactly the right framing.

With the right framing in place, I made a mental note of where the laptop was placed, and then removed it from the shot. Next, I set the timer on my camera and ran in front of it, placing my hand and arm into the frame:

I then downloaded this photo into the laptop, and placed the laptop back on top of the Ford Explorer. I brought up the photo, and scaled it so the outline of the Tetons roughly matched up with the "real world" Tetons from the perspective of the camera (still in exactly the same place, and zoomed the exact same amount, on its tripod).
What followed was painful. Over 72 times, I set the timer on the camera, rushed into the frame, and tried to place my arm behind the laptop so that (a) the wrist lined up in the right place, with the right perspective, and (b) the top fingers also appeared in the right place and perspective.
This took over two hours. During that time, I was rushing to beat a setting sun (and slowly drifting clouds), which was affecting the exposure. I also must have looked ridiculous to passing cars, running up to a laptop perched precariously on top of a car.
There were a few things making this even more difficult. I had to climb up on top of the running board of the Explorer to get high enough, and had to twist my body so my arm went "into" the laptop at the right angle. Although you can't tell from the finished shot, to get my wrist to line up with the wrist on the laptop screen, I had to hold my arm behind the laptop screen several inches (further requiring uncomfortable twisting and hanging onto the side of the Explorer with only the fingers of my left hand, which you can just barely make out in the final photo). Getting everything to line up perfectly was a pain; when my fingers would be perfect, the wrist wouldn't, and vice versa. Or sometimes my head would be in the shot.
All the while I had to be careful not to knock the laptop on the ground (I came very close several times), or to steady it when the wind picked up.

The final shot isn't perfect -- not everything lines up perfectly -- and the exposure on the laptop isn't the same as the background exposure (something that could have been fixed if we were allowed to use Photoshop). But the flaws aren't immediately obvious because your brain expects and "sees" one arm.
This was a gimmick photo, and I intentionally took it late in the week so as not to tempt other students to try and replicate it. (When you see this effect the first time, you gasp; when you see it a second time, you yawn.) But it came out pretty well, and managed to elicit a compliment from Jay Maisel. And that didn't happen often in the workshop!

